We’ve all seen the headlines. “AI will replace designers.” “AI creates stunning art in seconds.” As a designer, it’s easy to feel a mix of excitement and, let’s be honest, a little bit of dread. But I’m a practical person. I care about what actually works and what saves me time on a Tuesday afternoon when I’m facing a deadline. Hype doesn’t finish projects.
So, I decided to run an experiment. For one month, I tracked my time on real client projects. I split my work: half done the “old way” (my trusted manual process) and half using a suite of new AI tools. I wanted to see the real ROI. Where does AI really save time? And where is it just a gimmick? The results were not what I expected.
I’m John Michael, and I’ve spent the past five years working as a graphic and UI designer. My real passion, though, is seeing how new technology changes our creative process. I’ve been testing these new AI tools on my own client projects for a while now, trying to figure out what’s just hype and what actually saves me time at my desk. I’m not a data scientist, but I am a designer who needs to get work done, and this is what I found.
1. Background Generation & Complex Cutouts
This is the bread and butter of so much design work. Removing a background from a product shot or generating a simple, abstract texture for a website hero. It’s often tedious, not creative.
The “Old Way”: My Manual Process
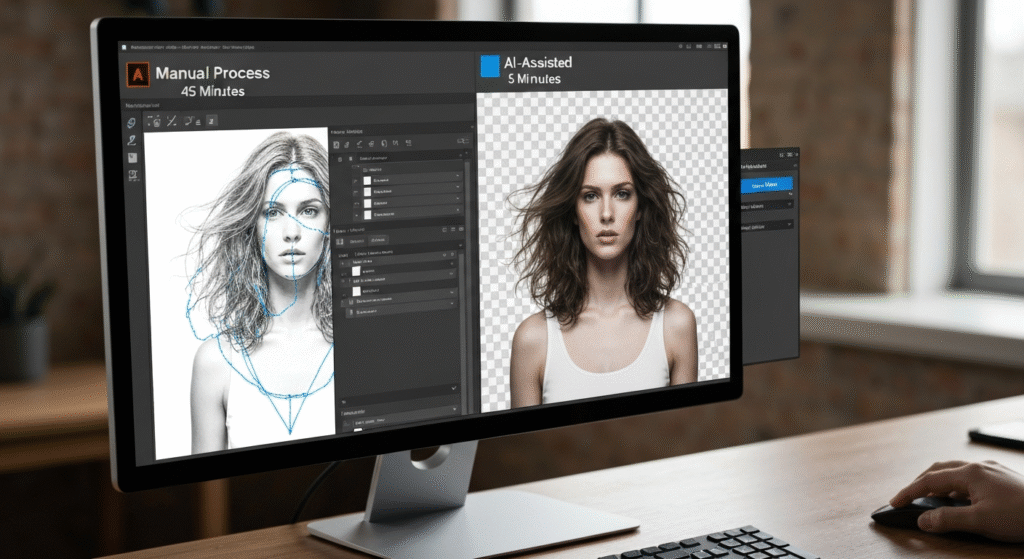
For complex cutouts, my go-to was always the Pen Tool in Photoshop. For a product shot with clean edges, this took maybe 5-10 minutes. But for something like a portrait with frizzy hair or a subject behind a chain-link fence? I could easily lose 45 minutes to an hour, meticulously clicking, refining masks, and using “Select and Mask” to catch stray hairs.
For generating backgrounds, I’d hunt through stock sites for the perfect “subtle abstract texture” or “minimalist gradient.” Or, I’d open Illustrator and spend 20-30 minutes making my own with blur effects and noise filters.
The “New Way”: Using AI Generators
Now, I use two main AI methods.
- For Cutouts: Photoshop’s “Select Subject” and “Object Selection” tools have become incredibly powerful. For 90% of objects, it’s a one-click process. For the remaining 10% (the frizzy hair), the “Refine Hair” button in “Select and Mask” does in seconds what used to take me 20 minutes of careful painting.
- For Generation: This is the big one. Using a tool like Adobe Firefly (built into Photoshop as Generative Fill) or Midjourney, I can just type a prompt. “Create a simple, abstract background with a soft blue and beige color palette, minimalist, subtle noise texture.” Within 60 seconds, I have four high-quality options to choose from.
The Time-Saving Breakdown
I tracked this on a recent e-commerce project where I had to process 12 product photos, some simple, some complex.
My Personal Data: This table is based on my own project files. Your times will vary based on the complexity of your images, but this was a pretty standard week of work for me.
| Task | Manual Method (My Average Time) | AI-Assisted Method (My Average Time) | Time Saved (Per Task) |
| Simple Cutout (e.g., a bottle) | 5 minutes (Pen Tool) | < 1 minute (Select Subject) | ~4 minutes |
| Complex Cutout (e.g., model with hair) | 45 minutes (Pen Tool + Refine Mask) | 5-7 minutes (Select Subject + Refine Hair) | ~38 minutes |
| Generate Abstract Background | 25 minutes (Stock search + editing) | 2 minutes (Generative Fill prompt) | ~23 minutes |
My Honest Take: Quality vs. Speed
For simple cutouts, the AI is a no-brainer. It’s fast and 99% accurate.
For complex cutouts, the AI gets you 95% of the way there. I still find myself zooming in to manually clean up a small edge that the AI missed or misunderstood. But it’s the difference between 5 minutes of cleanup and 45 minutes of manual labor. I’ll take that trade-off every single day.
For background generation, the AI is a huge creative boost. It saves time not just in creation, but in ideation. I can try five different styles in the time it used to take me to find one good stock photo. The quality is fantastic and commercially safe (using tools like Adobe Firefly).
Verdict: Huge time-saver. This is the least-hyped but most practical use of AI for me.
2. Brainstorming & Iterating Color Palettes
Choosing colors is deeply creative, but the initial brainstorming can be a grind. You know the feeling: scrolling endlessly through Pinterest, palettes sites, or brand guides, trying to find that perfect combination.
The “Old Way”: Scouring Coolors and Pinterest
My old process was a time sink. I’d spend 30 minutes on sites like Coolors or Adobe Color, hitting the spacebar and hoping for magic. Then I’d spend another 30-60 minutes gathering inspiration on Pinterest or Behance, creating a mood board, and using the eyedropper tool to pull colors. To get three solid, client-ready palettes, I was often looking at 1-2 hours of work.
The “New Way”: Prompting for Palettes
Now, I use AI as a starting point. I’ll use a tool like Khroma (which learns from colors you like) or even just a generative text AI. I’ll write a prompt:
“Act as an expert brand strategist. I need a 5-color palette for a new financial tech app. The brand keywords are ‘trustworthy,’ ‘modern,’ ‘human,’ and ‘accessible.’ Please provide hex codes for a primary, secondary, a neutral/background, an accent (for CTAs), and an error/success color.”
In 30 seconds, I have three or four solid, well-reasoned palettes to start from.
The Time-Saving Breakdown
I tracked this for a new website branding project. I needed three distinct palette options to present to the client.
A Note on This Data: The AI doesn’t finish the job. It just gets me to the starting line infinitely faster. The manual time includes all that searching and mood-boarding.
| Task | Manual Method (My Average Time) | AI-Assisted Method (My Average Time) | Time Saved (Per Task) |
| Find 3 Viable Palette Options | 1.5 hours (Searching, mood boarding, sampling) | 10 minutes (Prompting, light iteration) | ~1 hour 20 minutes |
| Refine Palettes & Apply to Mockup | 30 minutes | 30 minutes | 0 minutes |
My Honest Take: A Starting Point, Not a Final Stop
This is a perfect example of AI as an assistant. The AI doesn’t understand the client’s competitor landscape or the specific psychological nuance of why a certain blue feels “more trustworthy” than another.
But it completely eliminates the “blank page” problem. It gives me three great starting points that I can then take into Figma or Illustrator. I still spend the same amount of time (30 mins) refining the final choice, checking accessibility contrast, and applying it to my design. The AI just shaves off the 80 minutes of grunt work at the beginning.
Verdict: A massive time-saver for ideation. It doesn’t replace my design skill; it just respects my time.
3. Exploring Initial Layout Concepts (UI/Web)
When starting a new website or app screen, the first step is often exploring dozens of layout ideas. We sketch “crazy 8s” or build simple grey-box wireframes. This is fun, but it can be slow.
The “Old Way”: Sketching Dozens of Wireframes
For a new homepage, I’d typically time-box myself for 2 hours. I’d sketch on paper or in a tool like Balsamiq or Figma, trying to come up with 8-10 different concepts for the hero, features section, and footer. It’s hard to break out of your own ruts. I often found I was just redesigning the same 3 layouts over and over.
The “New Way”: AI for Layout Ideation
This is where tools like Uizard or AI plugins in Figma come in. I can write a prompt like, “Create a homepage layout for a SaaS product that sells project management software.” Or even crazier, I can sketch a rough layout on my iPad, upload the photo, and the AI will turn it into a clean, editable digital wireframe.
This lets me generate 10 wildly different ideas in minutes. Some are terrible, for sure. But they often include combinations I would never have thought of, breaking me out of my creative block.
The Time-Saving Breakdown
I tested this on a new mobile app dashboard screen. I needed ideas, fast.
A Quick Note: The “quality” of these AI layouts isn’t final. They are rough wireframes. But the speed of idea generation is the key metric here.
| Task | Manual Method (My Average Time) | AI-Assisted Method (My Average Time) | Time Saved (Per Task) |
| Generate 10 Distinct Layout Ideas | 2 hours (Sketching, digital wireframing) | 15 minutes (Prompting, uploading sketches) | ~1 hour 45 minutes |
My Honest Take: Great for Un-sticking, Bad for Details
The AI is terrible at information hierarchy. It doesn’t know what your client’s most important call-to-action is. It just knows what a “dashboard” or “homepage” usually looks like.
But as a brainstorming partner? It’s unbeatable. I use it to shatter my assumptions. I’ll generate 10 ideas, pick the two most interesting (but flawed) ones, and then begin my real design process from there. It saves me almost two hours of staring at a blank canvas and forces me to consider new approaches.
Verdict: A game-changer for early-stage ideation and overcoming creative blocks.
4. Upscaling Low-Res Client Assets
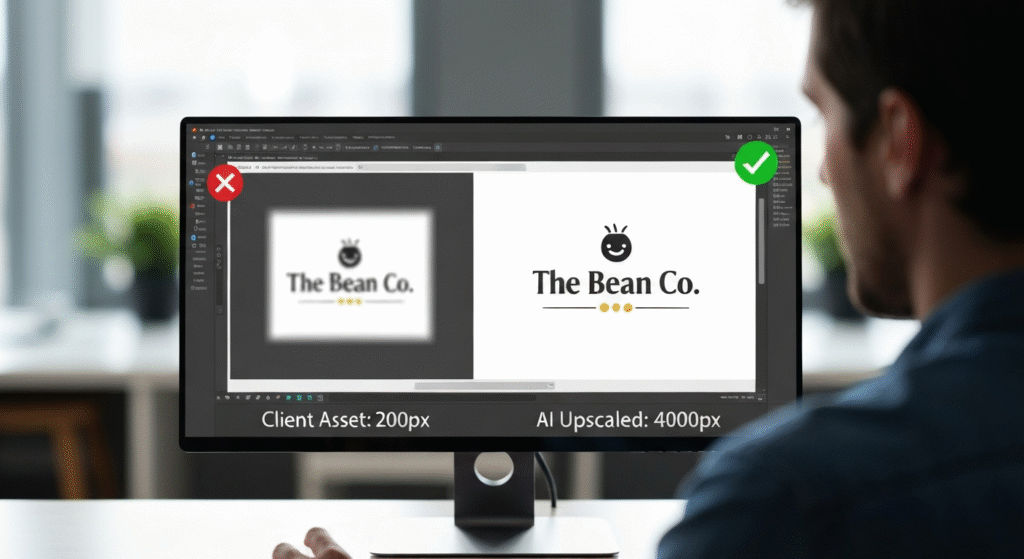
This is the task every designer dreads. The email arrives: “Here’s our logo. It’s in the email signature. Can you use that for the 10-foot trade show banner?” You open the 96dpi, 200px-wide JPG and die a little inside.
The “Old Way”: Photoshop’s “Preserve Details” and Praying
My old process was a series of hacks. I’d bring the image into Photoshop, resize it with “Preserve Details 2.0,” add a tiny bit of noise to hide the blur, apply an Unsharp Mask, and hope for the best. It was slow (15-20 minutes of careful tweaking) and the results were almost always soft, blurry, and barely usable. Or, I’d have to tell the client “no,” which is never fun.
The “New Way”: AI Image Upscalers
Now, I use a dedicated AI upscaling tool like Let's Enhance or Topaz Gigapixel AI. I upload the tiny, awful JPG, choose “4x” or “8x” upscale, and hit “go.” The AI rebuilds the image, sharpening edges and even re-creating lost detail in a way that traditional filters never could. It’s especially good at sharpening text and vector-like logo shapes.
The Time-Saving Breakdown
That exact trade show banner scenario happened last month. The client sent a 300px-wide logo. I needed it to be at least 4000px.
Data Disclaimer: This one feels like magic, so the numbers look a little crazy. But this is my real experience. The “Manual” time is me trying my absolute best to make a bad image usable.
| Task | Manual Method (My Average Time) | AI-Assisted Method (My Average Time) | Time Saved (Per Task) |
| Upscale 200px Logo for Print | 20 minutes (Tweaking filters, sharpening) | 2 minutes (Upload, click, download) | ~18 minutes |
| Resulting Quality | Poor. Blurry, artifacted, unusable. | Excellent. Sharp edges, clean text. | N/A (Saved the project) |
My Honest Take: This One is Almost Pure Magic
This isn’t just a time-saver; it’s a project-saver. The quality difference is night and day. The AI-upscaled version looks like a native vector file from a distance. Yes, if you zoom in 500%, you might see some weirdness. But for practical purposes, it’s a miracle.
There are limitations. It can struggle with human faces, sometimes giving them a “plastic” or “uncanny valley” look. But for logos, icons, and graphic elements? It’s incredible. It has saved me from so many awkward “I can’t use this” emails to clients.
Verdict: An essential tool. Saves a moderate amount of time but provides an immense leap in quality and capability.
5. Creating Realistic Product Mockups
After you’ve designed the logo or app, the client wants to see it “in the wild.” On a t-shirt, a coffee mug, a laptop screen, or a billboard.
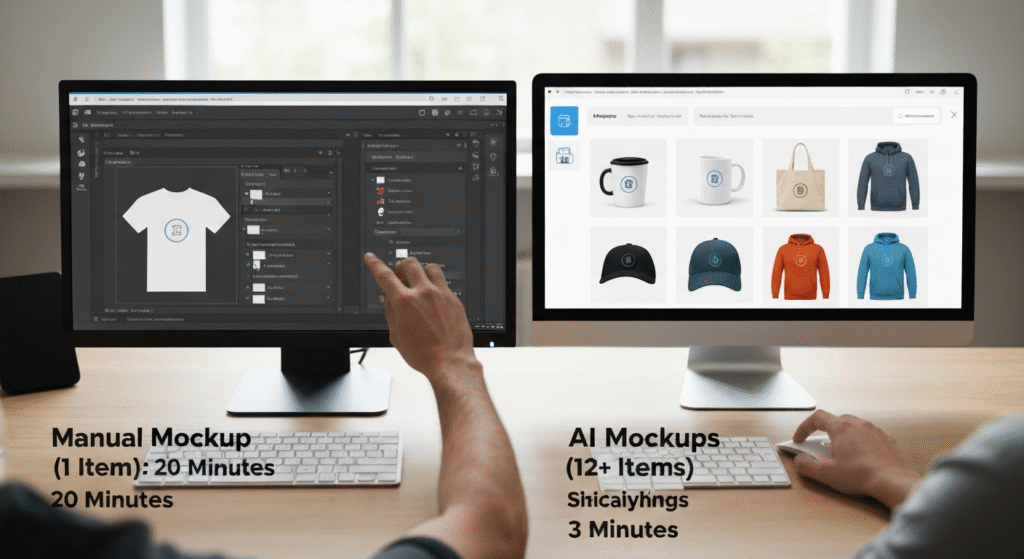
The “Old Way”: Finding PSDs and Warping Layers
This was a huge pain. My process involved:
- Go to a mockup site.
- Spend 20 minutes finding the right free PSD file.
- Download the (often huge) 500MB file.
- Open it in Photoshop.
- Find the correct “PLACE YOUR ART HERE” smart object layer.
- Paste in my design.
- Tweak the smart object, adjust displacement maps, and fight with lighting layers to make it look real.
To make 5 different mockups, I was easily looking at an hour of work.
The “New Way”: AI-Powered Mockup Tools
Now, I use a tool like Canva’s “Smart Mockups” or generative AI built into tools like Adobe Express. I just upload my flat JPG or PNG design. Then, I just click. “T-shirt.” “Laptop.” “Mug.” “Billboard.” The AI handles everything—the perspective, the warping, the lighting, the shadows.
Want the t-shirt to be a different color? Click a button. Want to move the logo? Just drag it on the mockup.
The Time-Saving Breakdown
For a recent branding presentation, I needed to show the new logo on 10 different items (stationery, apparel, digital).
A Note on This: This is another one where the time savings are just staggering. The manual process is so clunky, and the AI version is almost instantaneous.
| Task | Manual Method (My Average Time) | AI-Assisted Method (My Average Time) | Time Saved (Per Task) |
| Create 10 High-Quality Mockups | 2.5 – 3 hours (Finding, downloading, and editing 10 PSDs) | 15 minutes (Uploading one logo, clicking 10 templates) | ~2.5 hours+ |
My Honest Take: The “One-Click Wonder” That Actually Works
This is, by far, the biggest pure time-saver on the list. The quality is fantastic and, for 99% of client presentations, indistinguishable from a custom PSD mockup.
The only trade-off is “uniqueness.” If you use Canva’s mockups, you will eventually see other designers using the exact same photo of the “person holding a coffee mug.” But for a client who just wants to see their logo on a shirt, they do not care. It gets the idea across instantly and saves me hours.
Verdict: A massive, undeniable time-saver. It turns a half-day of annoying work into a 15-minute task.
The Big Caveat: When AI Was Slower
This report wouldn’t be honest if I didn’t include the flops. And I found a big one: creating highly specific, custom vector icons.
I had a project where I needed a very specific icon: “a magnifying glass over a bar chart, but the bar chart is also a leaf, symbolizing growth analytics.”
- My AI Attempt: I spent 45 minutes in Midjourney and DALL-E. I tried prompt after prompt. “Icon of a leaf bar chart under a magnifying glass.” “minimalist vector icon, leaf, data, analytics.” I got close, but the AI kept misunderstanding the concept. It would give me a leaf next to a bar chart. Or the magnifying glass would be misshapen. It was frustrating.
- My Manual Attempt: After 45 minutes of failing with AI, I gave up. I opened Adobe Illustrator. I drew a rectangle, duplicated it a few times (bar chart). I drew a simple leaf shape and used the Pathfinder to merge them. I drew a circle and a handle (magnifying glass).
Total manual time: 10 minutes.
Here’s the thing: AI is great at generating ideas (layouts, palettes) or performing technical tasks (upscaling, cutouts). It is terrible at specific, multi-part logical instructions. It’s an “enthusiastic intern,” as one great article on designing with AI explains. You can’t just give it a complex brief and expect a perfect result. Sometimes, it’s just faster to do it yourself.
What This All Means for Your Design Workflow
After a month of tracking, my conclusion is clear: AI is not a replacement. It is an assistant. And it’s a phenomenally good one at specific things.
It doesn’t do the thinking for me. It doesn’t understand the client’s strategic goals. It doesn’t have taste. That’s still my job.
What it does do is remove the most tedious, time-consuming, and uncreative parts of my day.
- It eliminates the “blank page” problem.
- It handles the technical grunt work.
- It saves me from project-killing low-res assets.
By saving me 5-8 hours a week on mockups, cutouts, and brainstorming, it gives me 5-8 more hours to spend on what matters: strategy, high-level creativity, and client communication. It’s not a threat; it’s the best tool I’ve added to my kit in the last five years.
Frequently Asked Questions (FAQs)
What are the best AI tools for these tasks?
For cutouts and generation, I stick inside Adobe Photoshop (Select Subject, Generative Fill). For upscaling, Let’s Enhance is great. For mockups, Canva’s Smart Mockups is the fastest. For layouts, Uizard is a popular starting point.
Does using AI make me a “less creative” designer?
Not at all. It just changes where you apply your creativity. You’re no longer a “Pen Tool expert.” You’re a creative director, guiding an assistant. Your skill shifts from manual execution to strategy, prompting, and curation.
Is AI good for final logo design?
In my experience, no. It’s fantastic for brainstorming logo ideas, but it’s terrible at the specifics—kerning, perfect geometry, and creating something truly unique and simple. I use it for a mood board, never for the final vector file.
How steep is the learning curve for these AI tools?
This is the best part. For most of them, the learning curve is almost zero. If you can type a sentence (a “prompt”), you can use them. The skill is in learning how to write good prompts, which just takes a little practice.
Final Thoughts
The key to using AI is to be smart about where you use it. Don’t try to make it do your entire job. Instead, identify the biggest bottlenecks and most tedious tasks in your current workflow.
Is it creating mockups? Is it cutting out backgrounds? Is it staring at a blank page waiting for a layout idea?
Start there. Apply AI to that one task. Track your time and see the difference. You might be surprised to find that AI doesn’t just save you time—it actually frees you up to be more creative.