
When I first decided to start an indoor herb garden, I had a very specific vision in my head. I pictured a lush, green windowsill in my small apartment that looked like something out of a magazine. I imagined snipping fresh basil for pasta and grabbing mint for tea whenever I wanted. It seemed easy enough. Plants grow in dirt, right? How hard could it be?
Well, it turns out it was harder than I thought. My name is wissam saddique, and I run Trend Tales Park. I didn’t start with a green thumb. In fact, I got into indoor container herb gardening purely out of frustration. I was trying to keep a few basic herbs alive in a cramped apartment and realized just how little straightforward information existed for people working with limited space. What started as a simple attempt to grow basil on a windowsill gradually became a deliberate process of testing different containers, light setups, and soil mixes.
But before I got the hang of it, I failed. A lot. In my first two months alone, I wasted over $80 on dead plants and useless supplies. I want to share the five biggest mistakes I made during those early days so you can save your money and your confidence.
Mistake 1: I Prioritized Style Over Drainage
This was the first and most expensive mistake I made. I went to a home goods store and found these beautiful, glazed ceramic pots. They matched my kitchen decor perfectly. They were sleek, modern, and had absolutely no holes in the bottom.
I thought this was a good thing. I didn’t want muddy water leaking onto my windowsill or staining my rental apartment’s counters. I figured if I was just careful with how much water I poured in, the plants would be fine. I bought three of them at $15 each.
The “Soup Bowl” Effect
Within two weeks, my rosemary looked terrible. The needles were turning brown, but the soil on top felt dry. I watered it again, thinking it was thirsty. A few days later, the plant was dead.
When I pulled the plant out, the smell hit me instantly. It smelled like a swamp. The bottom two inches of the pot were filled with stagnant, murky water. The roots had turned to black mush. I had essentially drowned my herbs because the water had nowhere to go. Roots need oxygen just as much as they need water, and I had suffocated them.
What I Learned About Roots
I learned that drainage isn’t optional. It is the single most important factor for indoor herbs. Without a hole for excess water to escape, you are fighting a losing battle against root rot. No matter how careful you are, eventually, water will pool at the bottom.
Here is a quick breakdown of what I thought versus what actually happened:
| My Assumption | The Reality | The Result |
| Pots without holes are cleaner. | Water gets trapped at the bottom. | Root rot and dead plants. |
| I can just add rocks to the bottom. | Rocks just raise the water table. | Roots still rot, just higher up. |
| I’ll be careful with watering. | It is impossible to see the bottom. | Guesswork leads to overwatering. |
Note: I used to think the “gravel at the bottom” trick worked. It doesn’t. It just creates a stagnant pool of water closer to the roots.

How I Fix This Now
I never plant directly into a decorative pot without a hole anymore. If I fall in love with a pot that has no drainage, I use it as a “cachepot” (a cover pot).
I keep the herb in the cheap plastic nursery pot it came in (which has plenty of holes) and slip that inside the decorative pot. When I water, I take the plastic pot out, water it in the sink, let it drain completely, and then put it back. This saves my furniture and my plants.
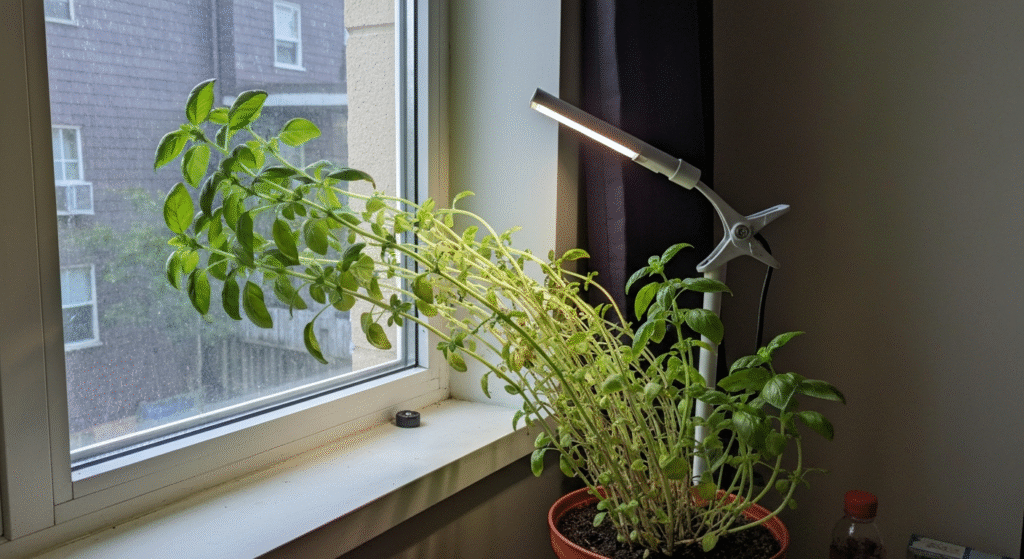
Mistake 2: Misjudging the Light (The “Bright Room” Trap)
I live in a small apartment, and I have a window that makes the kitchen feel bright and airy. I assumed that because the room felt bright to my eyes, it was bright enough for a plant. I set up my basil and cilantro on a shelf about four feet away from the window.
The Leggy Stretch
My basil didn’t die immediately. Instead, it started doing something weird. It grew tall and skinny. The stems were weak and pale, and the leaves were tiny and spaced far apart. It looked like it was stretching, trying desperately to reach the glass.
I later learned this is called “etiolation,” but at the time, I just thought my plant was growing fast. It wasn’t. It was starving.
Human eyes are amazing at adjusting to low light. We can read a book in a room that is actually quite dark for a plant. Basil is a sun-lover. It needs 6 to 8 hours of direct sunlight. Not “bright indirect light,” but actual sunbeams hitting the leaves. By placing it four feet away from the window, I had cut the light intensity by more than half.
The Window Direction Matters
I also didn’t pay attention to which way my window faced. It was a north-facing window. In the Northern Hemisphere, north-facing windows get the least amount of light. They almost never get direct sunbeams. I was trying to grow a Mediterranean herb that loves baking in the sun in a spot that had the light quality of a shady porch.
What I Do Differently
I stopped guessing. I spent a week actually watching where the sun hit my apartment floor. I realized I only had one window—in the bedroom—that got real afternoon sun (West-facing).
If you are struggling with this, I highly recommend reading up on how light intensity drops off over distance. The University of Minnesota Extension has a great explanation of how window direction affects plant growth.
Now, I keep my sun-loving herbs like basil and rosemary right up against the glass of my sunniest window. For the darker corners of my apartment, I finally invested in a simple grow light. It wasn’t expensive, and it stopped my basil from looking like a beanstalk.
Mistake 3: Watering on a Schedule, Not by Feel
I love routine. I like knowing that on Monday, I do laundry, and on Tuesday, I go grocery shopping. I tried to apply this same logic to my garden. I decided that Friday was “Watering Day.”
Every Friday morning, before work, I would give every single plant a cup of water. It didn’t matter if it was cloudy that week, or if the heater had been running, or how big the pot was. Friday was for water.
The Yellow Leaf Confusion
For the first few weeks, this seemed fine. Then, the mint started getting yellow leaves at the bottom. The parsley went limp. I panicked. I thought, “Oh no, they are wilting! They must need more water.” So I watered them again on Tuesday.
They got worse.
I was making the classic blunder: I was killing them with kindness. By watering on a strict schedule, I was ignoring the plant’s actual needs. Some weeks, the air was humid, and the soil stayed wet for ten days. Other weeks, it was dry, and they needed water in three days.
Overwatering is the number one killer of indoor herbs. I contributed to that statistic heavily in my first year.
The Finger Test
I had to unlearn my schedule. I stopped looking at the calendar and started looking at the soil. I learned the “Finger Test,” which is exactly what it sounds like.
- Stick your finger into the soil up to the second knuckle (about an inch or two deep).
- If it feels dry, water the plant.
- If it feels damp or cold, do not water it. Walk away. Check again tomorrow.
It sounds primitive, but it is more accurate than any schedule. I also learned to lift the pots. A pot with dry soil feels light, almost airy. A pot with wet soil feels heavy. Now, I walk by my herbs and just lift them up. If they feel light, they get a drink. If they feel heavy, I let them be.
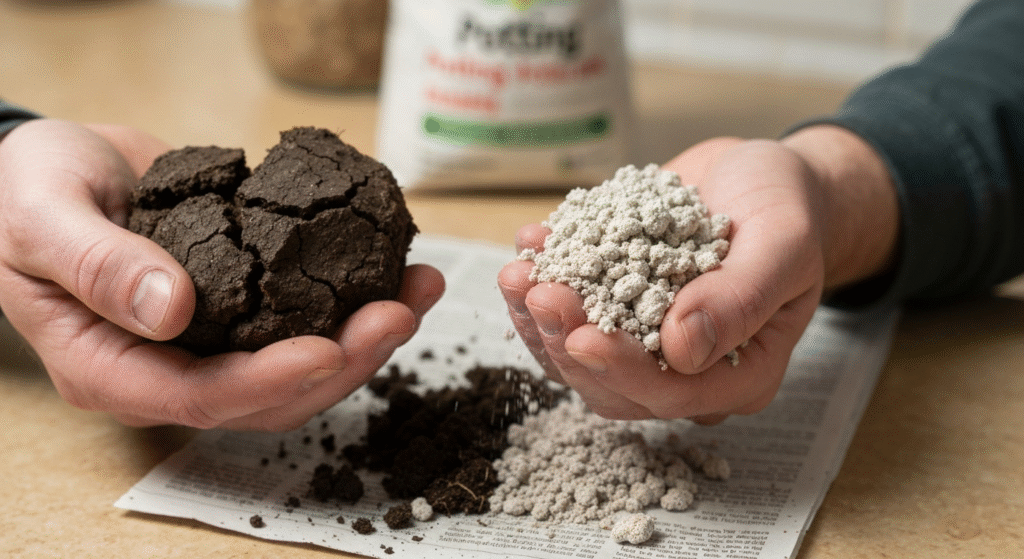
Mistake 4: Using Heavy Outdoor Garden Soil
In an effort to save money, I bought a huge bag of “Garden Soil” from a hardware store for about $4. It was heavy and dense. I figured dirt is dirt, and this was way cheaper than the “Potting Mix” that was $8 a bag.
I filled my containers with this heavy dirt and planted my seeds.
The Concrete Block
After a few weeks of watering, I noticed the water wasn’t soaking in. It was pooling on top. When it finally did drain, the soil dried into a hard, cracked brick. It had pulled away from the sides of the pot.
Outdoor garden soil is designed to be mixed into the ground. It often contains clay and sand. When you put it in a small container, it compacts. It crushes the tiny air pockets that roots need to breathe. My herbs were trying to grow roots through concrete. They were stunted, weak, and miserable.
Here is a quick look at the difference in soil types I noticed:
| Soil Type | Texture | Drainage | Verdict for Containers |
| Garden Soil / Topsoil | Heavy, dense, clay-like. | Poor. Turns to mud then brick. | Avoid. Too heavy for pots. |
| Potting Mix | Fluffy, light, contains perlite. | Excellent. Holds moisture but drains. | Essential. Worth the extra cost. |
Disclaimer: I’m not a soil scientist, but this physical difference was obvious as soon as I opened the bags.
The Fluffy Fix
I threw out that heavy dirt (well, I gave it to a friend with a backyard) and bought high-quality potting mix. The difference was night and day. Potting mix isn’t actually “dirt.” It’s usually a mix of peat moss (or coco coir), pine bark, and perlite (those little white popcorn-looking rocks).
Perlite is magic for indoor gardeners. It keeps the soil fluffy and ensures water drains through quickly. Now, if I squeeze a handful of my soil, it crumbles apart when I let go. It doesn’t stick together in a ball. That is the texture you want.
Mistake 5: Growing Too Many Varieties at Once
I was ambitious. I wanted a full chef’s garden immediately. I bought seeds for basil, parsley, cilantro, dill, chives, thyme, oregano, and mint. I started them all in the same week.
The Overwhelm
This was a disaster for several reasons. First, different herbs have different needs. My basil wanted tons of water and heat. My thyme wanted to dry out completely and liked cooler temps. By putting them all next to each other and treating them the same, half of them suffered.
Second, I ran out of space fast. I mentioned I live in a small apartment. Suddenly, I had 20 seedlings needing larger pots, and I had nowhere to put them.
Third, I got discouraged. When the cilantro bolted (went to seed) instantly because my apartment was too hot, and the dill got infested with aphids because it was weak, I felt like a failure. I had too many variables to manage for a beginner.
The “Big Three” Rule
If I could go back, I would tell myself to start with just three herbs.
- Basil: It grows fast, gives you quick feedback (wilts when thirsty, perks up when watered), and tastes great.
- Mint: It is almost impossible to kill. In fact, it grows so fast you have to keep it in its own pot or it will take over everything. It gave me a “win” when other plants were struggling.
- Parsley: It’s hardy and doesn’t need as much intense sun as basil.
By focusing on just three plants, I learned their specific “languages.” I learned what a thirsty basil plant looks like versus a thirsty parsley plant. Once I kept those alive for six months, then I added rosemary.
Why These Mistakes Matter
Making these mistakes didn’t just cost me $80 in dead plants and soil; it almost cost me my hobby. I almost quit because I thought I just didn’t have the “knack” for it.
The truth is, there is no “knack.” It’s just a set of variables: light, water, soil, and drainage. When you get the variables right, the plants want to grow. They are wired to survive. We just have to stop putting obstacles in their way.
If you are just starting out, please, buy the pot with the hole. Buy the lighter soil. Put the plant in the window, not near it. And touch the soil before you water it. If you do those four things, you are already miles ahead of where I was in my first year.
Gardening in an apartment is rewarding because it connects you to nature in a space that is usually separated from it. But it requires patience and a willingness to learn from the dead plants.
Frequently Asked Questions
Q: Can I drill holes in decorative ceramic pots myself?
A: Yes, you can, but be careful. You need a masonry bit and a power drill. I’ve cracked a few pots trying this. Honestly, keeping the plant in a plastic nursery pot and slipping it inside the decorative one is much easier and safer for the plant.
Q: My apartment is 70°F, is that okay for herbs?
A: Yes, that is actually perfect. Most common herbs thrive in the temperature range of 65°F to 75°F. If you are comfortable in a t-shirt, your herbs are likely happy with the temperature too. Just keep them away from drafty AC vents or heaters.
Q: Why did my supermarket basil die as soon as I brought it home?
A: Those supermarket plants are often packed with 20+ seedlings in one tiny pot to look full and sellable. They are overcrowded and root-bound. They usually aren’t meant to last long. If you buy one, you need to separate the stems into smaller groups and repot them immediately, or use them up quickly.
Q: How much did your initial setup actually cost after you fixed your mistakes?
A: Once I stopped wasting money on wrong items, a solid setup cost me about $40. That covered a good bag of potting mix ($8), a few plastic pots with saucers ($10), seeds ($5), and a small clip-on grow light ($15-17). You don’t need to spend a fortune to get started.
Final Thoughts
Looking back, that first failed garden was necessary. It taught me to pay attention. It taught me that nature doesn’t care about my schedule or my interior design preferences.
Don’t be afraid to make your own mistakes, but hopefully, you can skip the ones I made. Start small, ensure you have drainage, and chase the light. Your future pasta sauces (and your wallet) will thank you.