
One of the most common reasons indoor herb gardens stall or fail isn’t a lack of water or light—it’s a lack of space. You bring home a vibrant basil or rosemary plant, and for a few weeks, it thrives. Then, despite your best efforts, the leaves yellow, the growth stops, or the plant looks thirsty just hours after watering.
I’ve been there. When I first started Trend Tales Park, my focus was just keeping things alive in my small apartment. I didn’t realize that the nursery pots herbs come in are temporary homes, not permanent addresses. I spent months trying to coax growth out of a oregano plant that had essentially turned its soil into a brick of roots. It wasn’t until I actually pulled the plant out and saw the tangled mess underneath that I understood the problem.
Since then, I’ve made repotting a regular part of my routine. It’s less about following a strict calendar and more about reading the plant’s body language. Through plenty of trial and error—and a few spilled bags of soil on my kitchen floor—I’ve learned exactly when to make the move and how to do it without sending the plant into shock.
This guide covers the practical side of getting your herbs into a new home so they can actually grow.
Why Repotting is Non-Negotiable for Indoor Herbs
Before we get into the “how,” we have to look at what is happening inside that pot. Unlike outdoor plants that can stretch their roots deep into the earth to find moisture and nutrients, your indoor herbs are living in captivity. They only have access to the resources within those few inches of soil.
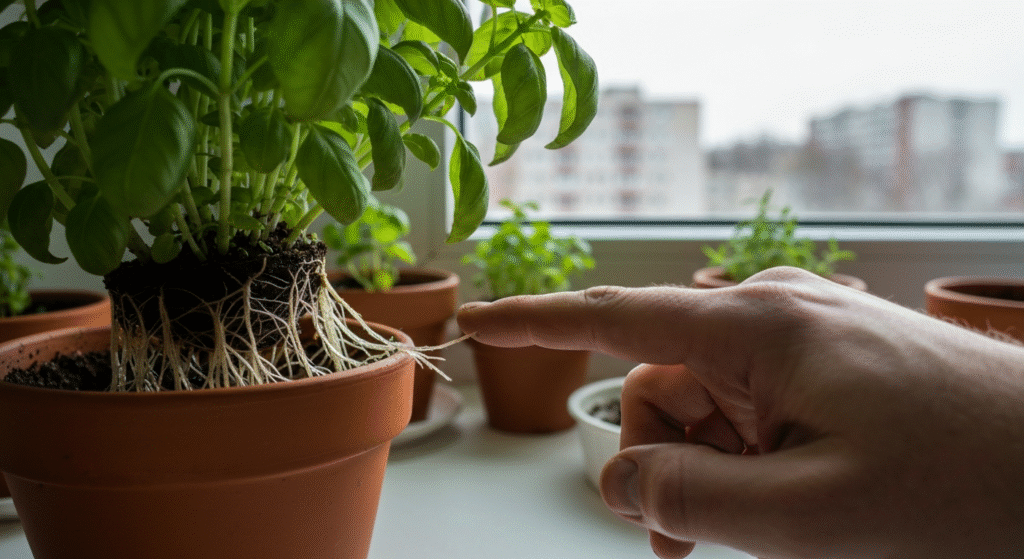
When an herb outgrows its container, it becomes “root-bound.” This means the roots have run out of room and are circling the inside of the pot, eventually displacing the soil. Less soil means the pot can’t hold water or nutrients.
I learned this the hard way with a store-bought mint plant. I watered it every day, yet it always looked wilted. When I finally took it out of the pot, there was almost no soil left—just a white, tight spiral of roots. I was basically pouring water over a root ball that had no way to absorb it.
The Two Types of Repotting
It is helpful to distinguish between two different actions, as they serve different purposes:
- Potting Up: This is what we are focusing on today. It involves moving the plant into a slightly larger container (usually 2 inches wider) to encourage new growth.
- Refreshing: Sometimes you keep the same pot size but change the soil. This is for maintenance when you don’t want the plant to get physically bigger, but the soil is exhausted.
Critical Signs Your Herb Needs a Bigger Home
Plants are pretty good at communicating when they are uncomfortable; you just have to know where to look. I check my herbs for these signs every time I water them. You don’t need to see all of these symptoms at once to justify a repot, but usually, they show up in pairs.
1. Roots Escaping the Pot
This is the most obvious red flag. If you lift your pot and see white or brown roots poking out of the drainage holes, the plant is screaming for space. I’ve also seen roots growing upwards, breaking the surface of the soil because there is nowhere else to go.
2. The “Water Slide” Effect
This is a huge annoyance for indoor gardeners. You pour water into the pot, and it immediately rushes out the bottom into the saucer, without soaking into the soil.
When a plant is root-bound, the ratio of roots to soil is off. The roots take up so much volume that there isn’t enough “sponge” (soil) left to hold the moisture. Alternatively, old, compacted soil can become hydrophobic (water-repellent). If you are watering daily and the soil feels dry an hour later, you need a bigger pot and fresh mix.
3. Stunted or “Sad” Growth
If your herb is getting enough light and water but hasn’t put out a new leaf in weeks, it’s likely stalled due to space restrictions. In my experience, basil is dramatic about this. It will simply stop growing and look pale if its roots hit a wall.
4. Top-Heaviness
I once had a rosemary plant that grew so tall it kept tipping over every time a fan blew nearby. If the canopy of the herb is significantly larger and heavier than the pot base, the plant is unstable. It needs a wider, heavier base to anchor it.
Summary of Symptoms
I keep a mental checklist when I’m inspecting my garden. Here is a breakdown of what to look for:
| Symptom | What It Looks Like | What It Means |
| The Escape Artist | Roots poking out of drainage holes or circling the topsoil. | The root system is physically larger than the container volume. |
| The Thirsty Ghost | Water runs straight through instantly; soil dries out in <24 hours. | Roots have displaced the soil; no moisture retention is possible. |
| ** The Yellow Stall** | Lower leaves turning yellow; zero new growth despite feeding. | Nutrients in the current soil are completely depleted. |
| The Tumbleweed | Plant falls over easily; looks disproportionately large for the pot. | The root ball isn’t heavy or wide enough to support the top growth. |
Timing: When is the Best Time to Repot?
Timing can be the difference between a plant that bounces back in two days and one that sulks for two weeks.
The Golden Rule: Spring and Summer
The best time to repot is during the active growing season. For most indoor herbs, this mimics the outdoor seasons of spring and early summer. Even indoors, plants sense the longer daylight hours and warmer temperatures.
When you repot during active growth, the plant has the energy to push roots into the fresh soil quickly. I usually do my major repotting weekends in March and again in June.
The Exception: Emergency Repotting
You can repot in winter or autumn if you absolutely have to. If you knock a pot over and it breaks, or if a plant is suffering from severe root rot (caused by poor drainage), don’t wait for spring. Just be gentle. Plants grow much slower in winter, so the recovery time will be longer, and you have to be very careful not to overwater the new soil.
My Experience: I once repotted a large parsley plant in December because it was totally root-bound. It survived, but it didn’t grow a single inch until March. It just sat there. If you can wait for spring, wait. If the plant is dying, act now.
The Setup: Getting Ready
Before you pull the plant out, you need to have everything ready. Repotting can be messy, especially in a small apartment, so I usually set up a “workstation” on my kitchen counter with a spread of old newspaper or a plastic tarp.
What you will need:
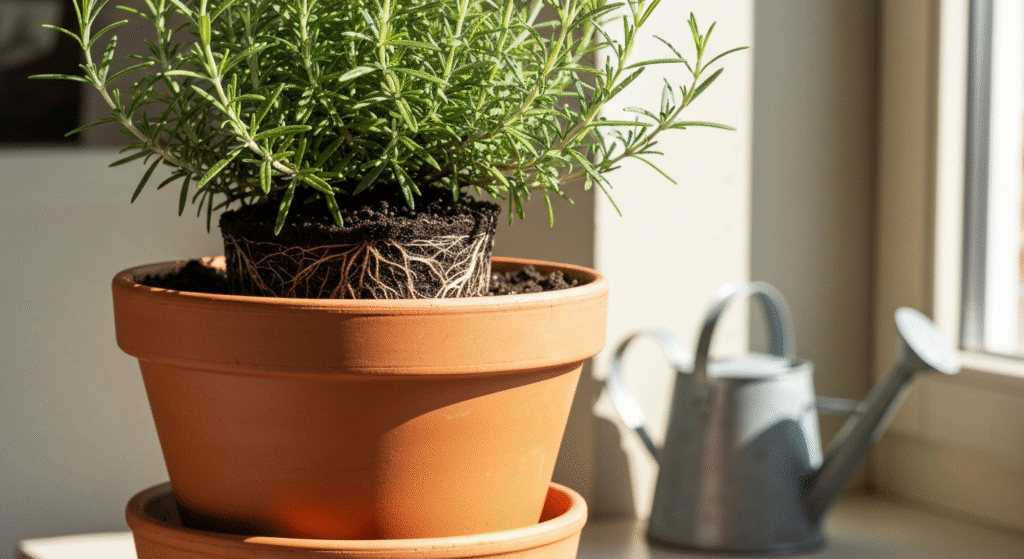
- The New Pot: It should be roughly 2 inches wider in diameter than the current pot. (Any larger, and you risk waterlogging the soil).
- Fresh Potting Mix: Never reuse the old soil from the root ball.
- Water: For settling the plant in.
- Scissors/Shears: Just in case you need to trim a broken root or dead stem.
The Pre-Game Watering:
This is a step many people skip. Water your herb thoroughly about an hour or two before you plan to repot it. Dry roots are brittle and snap easily. Moist roots are flexible and hold the soil ball together, making the transfer much smoother.
Step-by-Step Guide to Repotting Your Herbs
This is the method I’ve refined over the years. It minimizes mess and, more importantly, minimizes root shock.
Step 1: Prepare the New Container
Don’t pull the plant out yet. Get the new home ready first. I put a layer of fresh potting mix at the bottom of the new pot.
How much soil? I estimate it by holding the old pot next to the new one. The top of the plant’s root ball should sit about an inch below the rim of the new pot. This “headspace” is crucial—it ensures that when you water later, the water doesn’t overflow onto your floor.
Step 2: The Removal (The Gentle Tap)
Never pull a plant out by its stem. That is the quickest way to snap the plant off at the base.
- Place your hand over the top of the pot, with the main stem of the herb between your fingers.
- Turn the pot upside down (or sideways if it’s large).
- Tap the bottom of the pot firmly. If it’s a plastic nursery pot, I give the sides a gentle squeeze to loosen the friction.
- Let gravity do the work. The root ball should slide out into your hand.
If it’s stuck, don’t force it. Run a butter knife around the inside edge of the pot to sever any roots clinging to the sides, then try again.
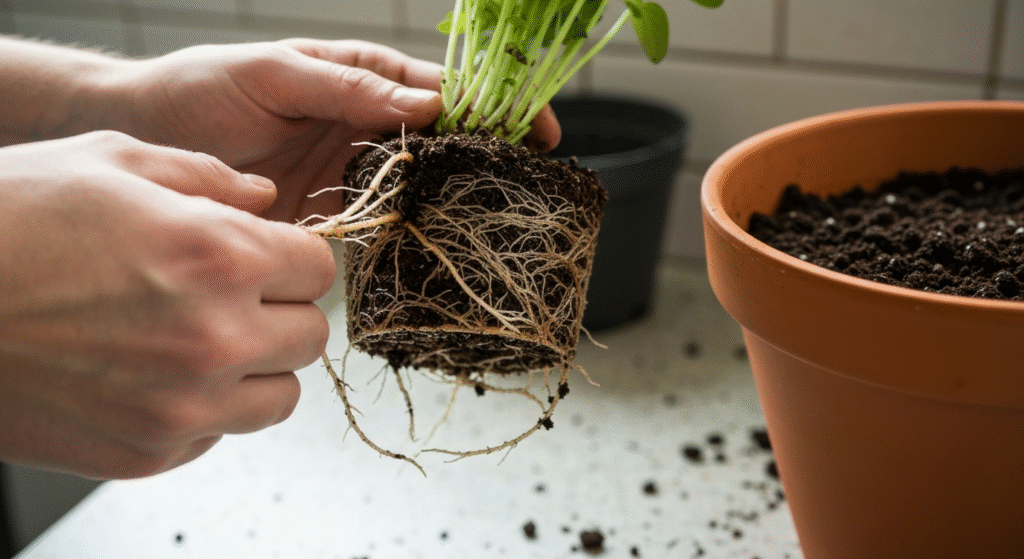
Step 3: Root Inspection and Teasing
Once the plant is out, look at the roots. Healthy roots should be whitish or tan and firm. If they are black and mushy, that is root rot (usually from overwatering), and those need to be trimmed off.
If the roots are winding tightly around the bottom in a circle, you need to break that memory. I gently “tease” the roots with my fingers. I loosen the bottom coils and tickle the sides of the root ball so the roots hang down slightly rather than staying in a tight knot.
This signals to the plant that it’s free to grow outward. If you just plop a tight root ball into new soil, the roots often keep growing in circles, unaware they have new space.
Step 4: The Transfer
Place the plant into the center of the new pot on top of the base layer of soil you added earlier. Check the height.
- Too high? Remove some soil from the bottom.
- Too low? Add a bit more.
You want the top of the old root ball to be level with the new soil line. Do not bury the stem of the herb deeper than it was before (unless it’s a tomato, but for herbs like basil, parsley, and thyme, burying the stem can cause rot).
Step 5: Filling the Gaps
Scoop fresh potting mix into the empty space between the root ball and the pot walls. I use a small trowel or just my hands.
Once filled, press the soil down gently with your thumbs. You aren’t trying to make concrete, but you need to eliminate large air pockets. Roots hate air pockets; they dry out and die in them. I usually tap the pot on the counter a few times to help the soil settle.
Step 6: The Anchor Water
Water the plant immediately. This isn’t just about hydration; the water acts like glue, settling the fine soil particles around the roots and removing any remaining air pockets. Water until you see it flow freely out of the drainage holes.
Post-Repotting Care: The Recovery Week
After you repot, your herb is going to be a little stressed. Imagine moving houses—you don’t unpack everything and run a marathon on the same day. You need a minute to settle in.
For the first 3 to 7 days, I treat the plant with kid gloves.
Light Adjustment:
Even if the herb loves full sun (like rosemary), I keep it out of harsh, direct midday sun for about three days after repotting. I move it a few feet back from the window. This reduces the rate of transpiration (water loss through leaves), allowing the roots to focus on getting established without struggling to keep up with hydration demands.
Do Not Fertilize:
Do not feed your plant right away. Fresh potting mix usually comes with a “starter charge” of nutrients that lasts for a few weeks. Adding liquid fertilizer immediately after repotting can burn the tender root tips that were exposed during the move. I usually wait at least a month before resuming my fertilizer schedule.
Monitor Moisture:
The new soil will hold water differently than the old, compacted root ball. Check the soil moisture daily by sticking your finger an inch into the soil. It might dry out slower than you are used to, so be careful not to overwater during this adjustment period.
Common Mistakes I’ve Made (So You Don’t Have To)
I’ve killed my fair share of plants during this process. Here are the biggest pitfalls I’ve encountered in my apartment gardening journey.
The “Too Big, Too Fast” Error
I once moved a small thyme plant from a 4-inch pot directly into a 10-inch pot, thinking, “Now I won’t have to repot it for years!”
The plant died within a month. Why? The volume of soil was so massive compared to the tiny root system that the soil stayed wet forever. The roots couldn’t drink it all fast enough, and they rotted. Stick to the 2-inch rule. Slow and steady increases are better than giant leaps.
Repotting Dry Plants
I tried to repot a bone-dry lavender plant once. When I pulled it out, half the soil crumbled away, and the fine roots tore apart because they were brittle. It looked like a skeleton when I put it in the new pot. It never recovered. Always hydrate the plant before operating on it.
Burying the Crown
On plants like strawberries or parsley, the “crown” is where the stems meet the roots. I used to bury this too deep to make the plant stand up straighter. This almost always leads to crown rot. Keep the soil level consistent with where it was in the previous pot.
For more technical details on plant physiology and why root health is vital, the University of Maryland Extension has an excellent resource on potting and repotting indoor plants that breaks down the science of root stress.
Frequently Asked Questions
1. Can I reuse the old potting soil for other plants?
I generally advise against it, especially for indoor containers. Old soil is usually depleted of nutrients and might harbor salts from tap water or dormant pests. It’s better to compost the old soil or use it in an outdoor garden bed where nature can rejuvenate it. For indoor pots, fresh mix ensures the best drainage and hygiene.
2. My plant looks droopy after repotting. Did I kill it?
Probably not. This is called “transplant shock.” It’s very common, especially if the roots were disturbed significantly. Keep the plant out of direct sun, ensure the soil is moist (but not soggy), and give it time. It should perk up within 3 to 5 days as the roots re-establish contact with the soil.
3. What if my herb is root-bound but I don’t have space for a bigger pot?
If you are maxed out on space, you can perform a root prune. This involves taking the plant out, trimming off the bottom 25% of the roots and some of the foliage, and putting it back into the same pot with fresh soil. However, this is a more advanced technique and is harder on the plant than simply potting up.
4. Do I need to put rocks at the bottom of the pot for drainage?
No, and this is a myth I followed for years! Putting rocks at the bottom actually raises the water table closer to the roots (a phenomenon called the “perched water table”), which can increase the risk of root rot. Just use a pot with holes and fill it entirely with potting mix.
Final Thoughts
Repotting can feel a bit intimidating at first because you are physically disrupting a living thing. But in my experience at Trend Tales Park, it is the single most effective way to reinvigorate a tired herb garden.
There is something very satisfying about knocking a plant out of its plastic shell, seeing those cramped roots, and giving them room to breathe. You will usually see a burst of new growth within two weeks, proving that the effort was worth it.
Don’t overthink it. If you see roots coming out the bottom, grab a slightly bigger pot, some fresh mix, and give your herbs the upgrade they deserve. Your basil pesto supply will thank you for it.